Google Custom Search API とは
Google が提供する検索エンジン API で、独自の検索エンジンを作成し、Web サイトやアプリケーション内で Google 検索の機能を利用することができます。
具体的には、Google Custom Search API を使用すると、特定のキーワードやドメインからの検索結果を取得し、それを自分の Web サイトやアプリケーションに組み込んだり、データ解析に使用したりすることができます。
例えば、特定のテーマに関連する Web サイトの情報を集めたり、自分のブログに関連する記事を自動的に抽出するなどの用途に利用できます。
手動で検索した結果との違い
Google Custom Search API を使用して得られる検索結果は、手動で Google 検索を行った場合とは微妙に異なる場合があります。これにはいくつかの理由があります。
検索アルゴリズム:
Google 検索エンジンは、検索アルゴリズムを定期的に更新しており、検索結果のランキングや表示される内容に影響を与えます。API と手動検索では、アルゴリズムのバージョンや更新タイミングが異なる可能性があります。パーソナライズされた検索:
手動で Google 検索を行うと、過去の検索履歴や位置情報などの個人情報をもとにパーソナライズされた検索結果が表示されることがあります。一方で、Google Custom Search API では、このようなパーソナライズ機能は利用できません。
Google Custom Search API の使い方
Google Custom Search API を使用するには、以下の手順を実行します。
- Google Cloud Console にログインします。
- 「新しいプロジェクトを作成」をクリックし、新しいプロジェクトを作成します。
- 作成したプロジェクトを選択し、API とサービス > ライブラリをクリックします。
- 「Google Custom Search API」を検索し、有効化します。
- 「API とサービス>認証情報」をクリックし、認証情報を作成します。
- 「認証情報を作成」>「API キー」を選択し、API キーを作成します。
- Google Custom Search Engine(CSE)にアクセスします。[1]Google Custom Search API を使用して検索する場合、検索エンジン ID が必要です。検索エンジン ID は、Google Custom Search … Continue reading
- 「新しい検索エンジンを作成する」をクリックします。
- 作成した検索エンジンの ID を取得します。
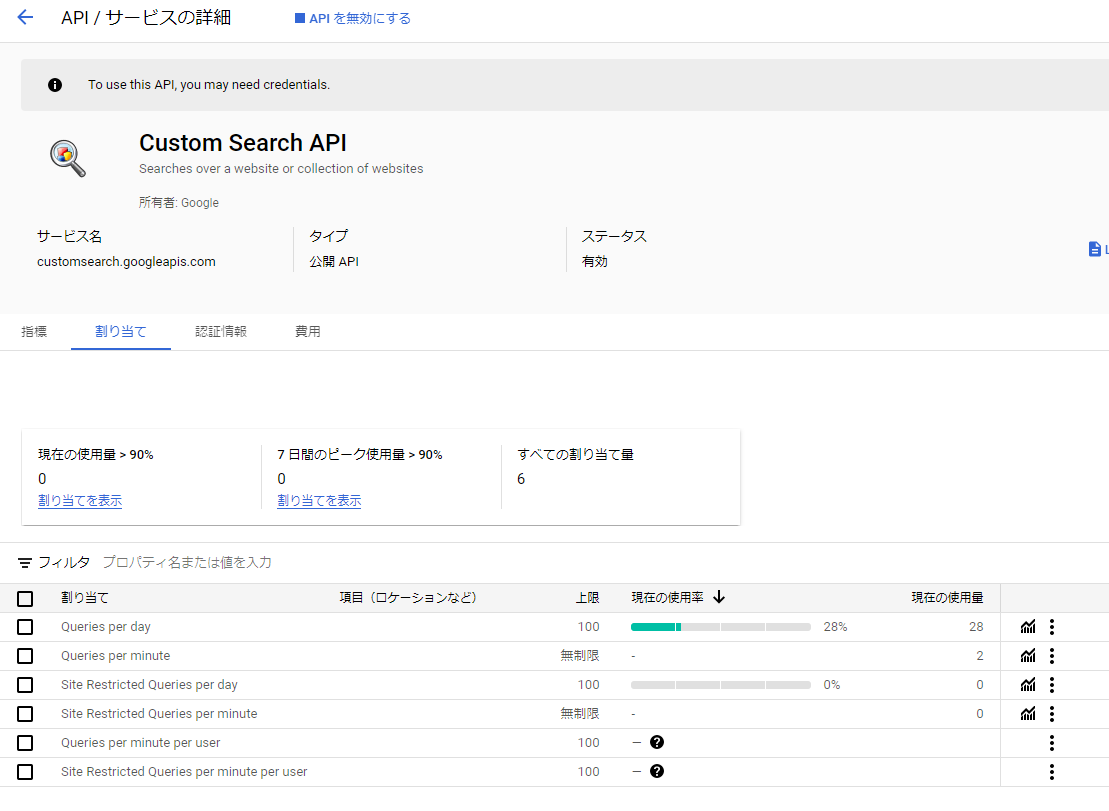
Google Custom Search API は、有料サービスですが、1日 100 回までの無料枠があります。無料枠を超えた場合は有料になりますので、ご注意ください。
なお、請求先アカウントを設定しなければ、無料枠を超えると API が使用できなくなるので、有料枠を使いたくない場合は、請求先アカウントを設定しないことをおススメします。
利用状況は、API の管理画面で確認できます。

Python を使用したサンプルスクリプト
Google Custom Search API を使用して、特定のキーワード(春のアニメ)で検索した結果を取得するPython のサンプルコードです。
from googleapiclient.discovery import build
import pprint

# API キーを設定
api_key = "API キー"

# 検索エンジン ID を設定
search_engine_id = "検索エンジン ID"

# キーワードを設定
query = "春のアニメ"

# Google Custom Search API を使って検索
service = build("customsearch", "v1", developerKey=api_key)
res = service.cse().list(q=query, cx=search_engine_id).execute()

# 検索結果を表示
pprint.pprint(res)
以下のスクリプトは、Google Custom Search API を使用して検索を行い、検索結果の各サイト(10件)を Google Chrome の新しいタブで開きます。
import webbrowser
from googleapiclient.discovery import build

# API キーを設定
api_key = "API キー"

# 検索エンジン ID を設定
search_engine_id = "検索エンジン ID"

# キーワードを入力
query = input("検索キーワードを入力してください: ")

# Google Custom Search API を使って検索
service = build("customsearch", "v1", developerKey=api_key)
res = service.cse().list(q=query, cx=search_engine_id).execute()

# Google Chromeを指定
chrome_path = "C:/Program Files (x86)/Google/Chrome/Application/chrome.exe %s"

# 検索結果から件名と URL を表示し、Chromeの新しいタブで開く
for item in res['items']:
    print(item['title'])
    print(item['link'])
    print()
    webbrowser.get(chrome_path).open(item['link'])
tkinter という Python の標準 GUI ライブラリを使用して、検索キーワードを入力するボックスを作成する場合は以下になります。
import webbrowser
from tkinter import *
from googleapiclient.discovery import build

def search(event=None):
    query = entry.get()

    # Google Custom Search API を使って検索
    service = build("customsearch", "v1", developerKey=api_key)
    res = service.cse().list(q=query, cx=search_engine_id).execute()

    # Google Chromeを指定
    chrome_path = "C:/Program Files (x86)/Google/Chrome/Application/chrome.exe %s"

    # 検索結果から件名と URL を表示し、Chromeの新しいタブで開く
    for item in res['items']:
        print(item['title'])
        print(item['link'])
        print()
        webbrowser.get(chrome_path).open(item['link'])

    entry.delete(0, END)

# API キーを設定
api_key = "API キー"

# 検索エンジン ID を設定
search_engine_id = "検索エンジン ID"

# Tkinter ウィンドウの作成
root = Tk()
root.title("Google Search")
root.geometry("300x100")

# エントリウィジェット(テキストボックス)の作成
entry = Entry(root, width=30)
entry.grid(row=0, column=0, padx=10, pady=10)

# 検索ボタンの作成
search_button = Button(root, text="検索", command=search)
search_button.grid(row=0, column=1, padx=10, pady=10)

# エントリウィジェットでEnterキーを押したときに検索を実行する
root.bind('<Return>', search)

root.mainloop()
また、以下のサンプルではウィンドウを常に全面&半透明にして、Chrome のブックマークをメニューに追加しています。
# ----------------------------------------------------------------------------
# Author: tomo
# Creation Date: 2023-04-13
#
# This script is free to use and modify at your own discretion.
# No warranty is provided for the script's functionality.
# Use this script at your own risk.
# ----------------------------------------------------------------------------
import json
import os
import webbrowser
from tkinter import *
from googleapiclient.discovery import build
import psutil
import time
import subprocess

def is_chrome_running():
    for process in psutil.process_iter(['name']):
        if process.info['name'] == 'chrome.exe':
            return True
    return False

def search(event=None):
    query = entry.get()

    # Google Custom Search API を使って検索
    service = build("customsearch", "v1", developerKey=api_key)
    res = service.cse().list(q=query, cx=search_engine_id).execute()

    # Google Chromeを指定
    chrome_path = "C:/Program Files (x86)/Google/Chrome/Application/chrome.exe"

    first_result = True

    # 検索結果から件名と URL を表示し、Chromeの新しいタブで開く
    for item in res['items']:
        print(item['title'])
        print(item['link'])
        print()

        if not is_chrome_running() and first_result:
            subprocess.Popen([chrome_path, item['link']])
            first_result = False
        else:
            subprocess.Popen([chrome_path, '--new-tab', item['link']])

    entry.delete(0, END)
    entry.focus_set()

def open_bookmark(url):
    chrome_path = "C:/Program Files (x86)/Google/Chrome/Application/chrome.exe %s"
    webbrowser.get(chrome_path).open(url)

def load_bookmarks(file_path):
    with open(file_path, 'r', encoding='utf-8') as f:
        data = json.load(f)
    return data['roots']

def build_menu(menu, bookmarks):
    for item in bookmarks:
        if 'children' in item:
            submenu = Menu(menu, tearoff=0)
            build_menu(submenu, item['children'])
            menu.add_cascade(label=item['name'], menu=submenu)
        elif 'url' in item:
            menu.add_command(label=item['name'], command=lambda url=item['url']: open_bookmark(url))

# API キーを設定
api_key = "API キー"

# 検索エンジン ID を設定
search_engine_id = "検索エンジン ID"

# Tkinter ウィンドウの作成
root = Tk()
root.title("Google Search")
root.geometry("400x100")

# ウィンドウを最前面に表示
root.attributes("-topmost", True)

# ウィンドウを半透明にする
root.attributes("-alpha", 0.7)

# メニューバーの作成
menubar = Menu(root)
root.config(menu=menubar)

# ブックマークデータの読み込み
bookmarks_path = os.path.join(os.environ["LOCALAPPDATA"], r"Google\Chrome\User Data\Profile 6\Bookmarks")
bookmarks_data = load_bookmarks(bookmarks_path)

# ブックマークメニューの作成
bookmark_menu = Menu(menubar, tearoff=0)
build_menu(bookmark_menu, bookmarks_data['bookmark_bar']['children'])
menubar.add_cascade(label="ブックマーク", menu=bookmark_menu)

# エントリウィジェット(テキストボックス)の作成
entry = Entry(root, width=30, font=("TkDefaultFont", 14))
entry.grid(row=0, column=0, padx=10, pady=10)


# 検索ボタンの作成
search_button = Button(root, text="検索", command=search)
search_button.grid(row=0, column=1, padx=10, pady=10)

# エントリウィジェットでEnterキーを押したときに検索を実行する
root.bind('<Return>', search)

root.mainloop()
以上
脚注
| ↑1 | Google Custom Search API を使用して検索する場合、検索エンジン ID が必要です。検索エンジン ID は、Google Custom Search Engine(CSE)を作成する際に作成され、CSE を作成すると、Google はそのサイトに対する検索エンジンを提供します。 |
|---|