

はじめに
Ubuntu は、世界中で広く利用されている Debian 派生の Linux OSで す。直感的な操作性を備え、Web サーバー構築からローカルでのシステム開発まで、多様な用途で標準的な OS として活用されています。
現在は安定版の「24.04 LTS」が主流ですが、2026年4月にリリースが予定されている次期長期サポート版「Ubuntu 26.04 LTS」への期待も高まっており、最新の AI 開発環境などの基盤として新たに導入を検討するユーザーが増加しています。本記事では、現行バージョンはもちろん次期バージョンでも通用する、Ubuntu Desktop の基本的なインストール手順と実務で必須となる初期設定を解説します。
- Ubuntuを導入するメリットと最新トレンド(26.04 LTS の展望や AI 開発環境)
- 公式イメージを用いた Ubuntu Desktop の基本的なインストール手順
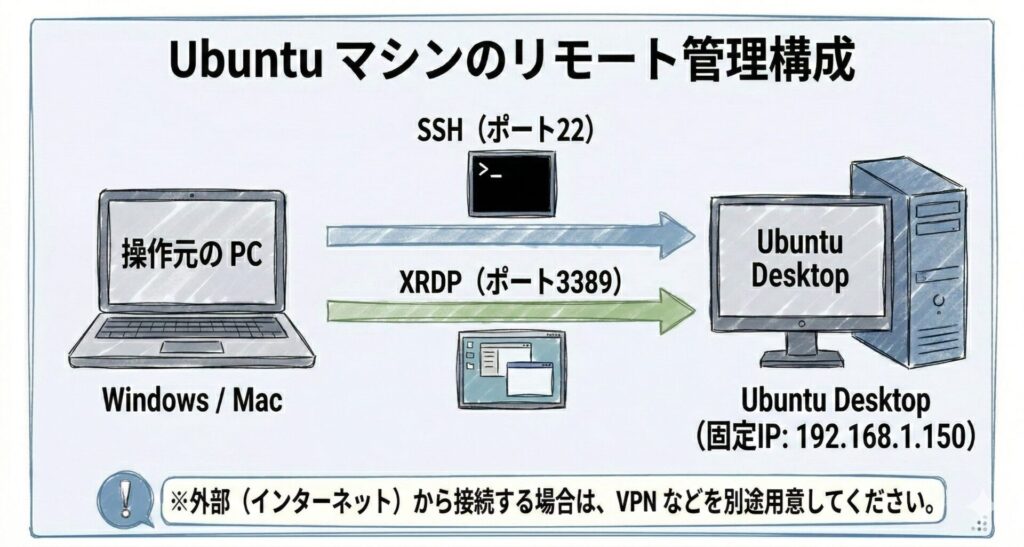
- 固定 IP 化や SSH/XRDP を用いたリモート接続などの初期設定手法
なぜ今 Ubuntu が選ばれるのか?(AI 開発基盤と次期 26.04 LTS への期待)
Linux ディストリビューションの中でも、Ubuntu はサーバーからデスクトップまで幅広い用途で採用されています。ここでは、基本的なメリットと近年の導入トレンドについて解説します。
初心者にも扱いやすい Linux OS としてのメリット
Ubuntu は、豊富なパッケージ群と巨大なコミュニティを持つ Debian をベースに開発されています。特に Desktop 版は、Windows や macOS に近い直感的な GUI(グラフィカル・ユーザー・インターフェース)を備えており、コマンド操作(CUI)に不慣れなユーザーでも直感的に導入できる点がメリットです。 また、インターネット上に技術情報やトラブルシューティングのノウハウが多数存在するため、開発環境の構築時に問題を解決しやすいという強みがあります。
ローカル AI 環境(OpenClaw や antigravity など)の基盤としての需要
近年、Ubuntu のインストール需要がさらに高まっている背景には、ローカル環境における AI 開発の活発化があります。
高度な機械学習ライブラリや最新ツールの多くは、Linux 環境での動作を前提に設計されています。例えば、自律型 AIエージェントをローカルで動かす「OpenClaw」や、最新フレームワークである「antigravity」といったオープンソース技術を検証するためのベース OS として、Ubuntu が推奨されています。
さらに、2026年4月には次期長期サポート版である「Ubuntu 26.04 LTS」のリリースが控えています。これに向けて、最新のシステム基盤を用いた開発環境の準備や、汎用的なインストール・初期設定手順をあらかじめ確認しておく重要性が高まっています。
Ubuntu Desktop のインストール手順
公式サイトから OS のイメージファイルを取得し、PC または仮想マシン環境へ Ubuntu をインストールする基本的な流れを解説します。
ISO イメージのダウンロードとインストーラーの起動
ダウンロードした ISO ファイルを用いてインストール用の USB メディアを作成(または仮想マシンにマウント)し、対象のデバイスを起動します。
言語設定・ディスク構成・ユーザー作成までの基本的な流れ
インストーラーが起動した後は、画面の指示に従って以下の基本設定を行います。
最初の画面の左側にある言語リストから一番下付近にある「日本語」を選択し、「Ubuntu をインストール」をクリックします。
左右のリストでともに「Japanese」が選択されていることを確認し、「続ける」をクリックします。
「ディスクを削除してUbuntuをインストール」を選択し、「インストール」をクリックします。
- ※注意:この操作により対象ディスクの既存データはすべて消去されます。専用の PC や仮想環境で実行してください。
- 確認ダイアログが表示されたら「続ける」を選択して変更を書き込みます。
居住地域の画面で、日本国内であれば「Tokyo」が選択されていることを確認して「続ける」をクリックします。
「あなたの名前(ユーザー名)」「コンピューター名」「パスワード」を入力します。ここで設定したパスワードは、ログイン時や管理者権限(sudo)を実行する際に必要となります。
「続ける」をクリックするとファイルのコピーとインストールが開始されます。完了画面が表示されたら「今すぐ再起動する」をクリックし、インストールメディアを抜いてシステムを立ち上げます。
初期設定(リモート接続・開発環境)
Ubuntuのインストール完了後、実務や開発用途で利用するためには、ネットワークの固定化や外部からのリモート操作を可能にする設定が必要です。端末(Terminal)を開き、以下の手順で初期設定を行います。
基本エディタ(Vim)の導入と固定 IP(Netplan)の設定
システムの設定ファイルを編集するため、まずは標準的なテキストエディタである「Vim」をインストールし、文字化けを防ぐ設定を行います。
$ sudo apt install vim
$ vim ~/.vimrc
【~/.vimrc への追記内容】
set encoding=utf-8
set fileencodings=iso-2022-jp,euc-jp,sjis,utf-8
filetype indent off
次に、別の PC からリモート接続する際に IP アドレスが変わらないよう、Netplan を使用して固定 IP アドレスを設定します。環境に合わせて IP アドレスやゲートウェイを書き換えてください。
$ sudo vim /etc/netplan/99_config.yaml【99_config.yaml の記述例】
network:
  version: 2
  renderer: networkd
  ethernets:
    ens33:
      addresses:
        - 192.168.1.150/24
      gateway4: 192.168.1.2
      nameservers:
          search: [mydomain, otherdomain]
          addresses: [1.1.1.1, 8.8.8.8]
設定を保存後、以下のコマンドでネットワーク設定を反映させます。
$ sudo netplan apply外部からのリモートアクセス(SSH・XRDP)の有効化
他の PC から Ubuntu を遠隔操作するために、コマンドベースで接続する「SSH」と、画面(GUI)ごと接続する「XRDP」を導入し、ファイアウォール(UFW)のポートを開放します。
【XRDP(リモートデスクトップ)の導入】
$ sudo apt install xrdp
$ sudo systemctl enable xrdp
$ sudo ufw allow from any to any port 3389 proto tcp
【SSH の導入】
$ sudo apt install openssh-server
$ sudo systemctl enable ssh
$ sudo ufw allow from any to any port 22 proto tcp
Python 開発環境の準備
AI 開発やデータスクレイピングを行うため、Python のパッケージ管理ツール(pip)と、代表的なライブラリをインストールします。Ubuntu には標準で Python3 がインストールされています。
# pipのインストール
$ sudo apt install python3-pip
# スクレイピング用ライブラリのインストール
$ pip3 install beautifulsoup4
$ pip3 install lxml
ローカル環境で開発したデータやスクリプトを安全にバックアップ・共有するために、Google Drive と連携させることもできます。連携手順については以下の記事をご参照ください。

まとめ
本記事では、最新の Ubuntu Desktop のインストール手順と、実務で必須となる初期設定について解説しました。
- Ubuntu は初心者にも扱いやすく、最新AI開発の基盤OSとしても需要が高まっている。
- 公式 ISO イメージを利用し、ディスクをフォーマットして日本語環境でインストールを行う。
- 固定 IP 化、SSH/XRDP の開放、Python 環境の構築を行うことで実用的な開発環境が作れる。
以上、最後までお読みいただきありがとうございました。